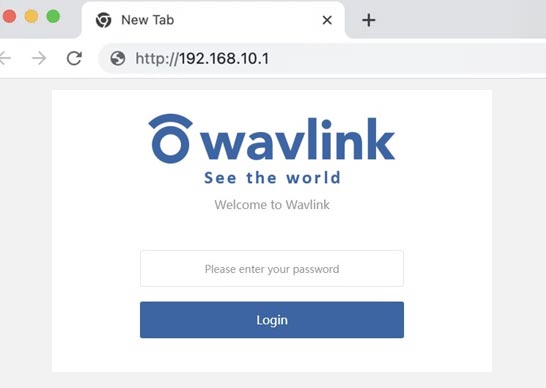
Wavlink WiFi Extender Login Guide

For customizing the Wavlink extender’s settings, performing Wavlink WiFi extender login is an essential task. However, it has been noticed that some users are unable to do Wavlink login either due to partial knowledge or due to some mistakes. If you also need help with the Wavlink extender login process, then walk through the sections given below. This page covers all the necessary information related to Wavlink admin login. Continue reading.

How to Perform Wavlink WiFi Extender Login?

FYI, Wavlink extender login can be done depending upon the mode on which your WiFi device is operating. These three different modes are Repeater mode, AP mode, and Router mode. So, let’s have a quick look at the steps to do Wavlink login for these three operating modes.

Wavlink WiFi Extender Login in Repeater Mode

When the extender operates in the Repeater mode, it reinforces the WiFi signals emitted by your host router to extend the internet coverage. The instructions given below will help you with the Wavlink extender login process in the Repeater mode:

  • First of all, power up your Wavlink WiFi extender after connecting it to a wall socket.
  • Thereafter, position the Mode Selector button to the Repeater mode.
  • Get your hands on an Ethernet cable and use it for connecting your devices (extender and router).
  • In case you do not own an Ethernet source, you can take the assistance of a wireless one.
  • Once done, switch on your PC.
  • Pull up an already installed web browser.
  • Navigate to the address field.
  • Type wifi.wavlink.com or ap.setup into it.
  • Press Enter.
  • The Wavlink login page will welcome you.
  • Here, you will be asked for the Wavlink login password and to select the language.
  • Complete the required details and click Login.
  • The moment you click Login, the web-based management utility of your wireless device will be revealed.

With that, you have successfully completed the Wavlink admin login process in the Repeater mode. In case you are unable to do Wavlink login even after following the aforementioned instructions, contact our experts at any time of the day. They’ll provide you personalized assistance to complete the Wavlink WiFi extender login process in the Repeater mode.

Email Us

Facing Wavlink login issues? Write to us at support@wavlinklogin.com and our experts will respond to you as soon as possible.

Chat With Us

Chat with our profound experts and get answers to all your queries related to Wavlink WiFi range extender and wifi wavlink com login process.

24*7 Support

Our technical support experts are available to help you fix Wavlink WiFi extender login issues 24×7.

Still Facing Issues? Contact Our Experts Right Away!

+1-888-965-7673

Wavlink WiFi Extender Login in AP Mode

The AP mode of the Wavlink extender allows the extender to transmit WiFi signals in the entire house when connected to the host router using a wired source. Check out the following instructions in order to do Wavlink WiFi login in the AP mode:

  • Initiate the wifi wavlink com login process by setting the Mode Selector button to the AP position after powering up your Wavlink wireless extender.
  • Once done, connect the host router and your Wavlink device with the aid of an Ethernet source.
  • Thereafter, load an internet browser on your laptop or PC to access the Wavlink login page.
  • Once the web browser is ready to use, move the mouse cursor to the URL field.
  • Insert wifi.wavlink.com or ap.setup.
  • Hitting Enter will redirect you to the ap.setup Wavlink login screen.
  • Now, type the default Wavlink WiFi repeater login password into the designated field.
  • Also, choose the language to manage your Wavlink WiFi extender.
  • Click Login.
Tips for Successful Extender Login

The appearance of the dashboard of the extender will signify that you’ve successfully completed the Wavlink admin login process in the AP mode. Now, you can manage and modify the settings of your wireless device according to your will.

Wavlink WiFi Extender Login in Router Mode

The Router mode of the Wavlink WiFi extender is suitable for those users who do not own a router and have directly connected their extenders to DSLs or cable modems. Following the instructions given below will help you to perform Wavlink WiFi login in the Router mode:

  • Ensure that the Wavlink extender is powered up and the Mode Selector button is set to Router.
  • Create an Ethernet between your Wavlink extender and the DSL or cable modem.
  • Access wifi.wavlink.com or ap.setup.
  • As soon as the ap.setup Wavlink login page appears, input the default WiFi repeater login password.
  • Complete the other requirements after entering the wifi wavlink com login password and hit Login.
  • The Router wizard of your Wavlink extender will be displayed.

This completes our discussion on the Wavlink login process in the Router mode. In case you need more help executing the Wavlink extender login process, consider getting in touch with our technicians for immediate help.

Still Facing Issues? Contact Our Experts Right Away!

+1-888-965-7673

Facing Wavlink WiFi Extender Login Issues?

Issues can arise in any situation and the Wavlink WiFi login process is no exception. Many users have reported that they can’t do Wavlink admin login even after executing the correct steps. If you have also got your name mentioned on the list of users struggling with Wavlink setup login issues, this section will make you aware of the reasons leading to Wavlink WiFi extender login failure. Following are the potential reasons that might stop you from doing Wavlink admin login:

Wavlink WiFi Extender Reset
  • You might be using an outdated version of the internet browser to access wifi wavlink com login window
  • Pent-up cache and cookies might be stopping you from getting access to the http //wifi.wavlink.com login page
  • Incorrect entree of the default web address
  • You might haven’t entered the correct Wavlink login password
  • The extender is getting insufficient electricity
  • Your Wavlink device might be sitting at an incorrect location
  • Technical glitches are subduing your extender’s performance thereby leading to ap.setup login issues
  • Your extender is located nowhere near the main router
  • The Ethernet connection between your WiFi devices has become unstable
  • An antivirus software can also prevent you from doing Wavlink WiFi login

Now that you have become aware of the reasons that might be creating hurdles in the path of getting Wavlink login success, it is time to troubleshoot the issue. So, give a read to the next section and find the solution to Wavlink extender login problems.

Fixed: Wavlink WiFi Extender Login Issues

1. Update the Web Browser

The web browser is one of the main factors of the Wavlink WiFi login process. This is because it lets you access the http //wifi.wavlink.com login page and reach the extender’s settings. However, using an outdated version of the internet browser isn’t a good idea to do Wavlink extender login. Therefore, consider updating the web browser currently in use and see to it if you get success with the process by accessing the http //wifi.wavlink.com login page.

2. Delete Browser’s Cache

Yes, for Wavlink setup login process, you have the liberty to use any web browser that is updated. However, using its cached version for Wavlink WiFi extender login is not suggested. If the web browser is not free of cache, cookies, and browsing history, then it will load a cached version of the Wavlink extender login page. Therefore, navigate to the Settings section of the internet browser and delete all unnecessary files.

3. Check the Web Address Entree

The entree of the default web address of the extender during the Wavlink WiFi login process matters a lot. It is a default gateway using which one can reach the Wavlink login page. So, consider avoiding typing mistakes while entering the Wavlink extender’s default web URL. Apart from this, take care of the fact that the web address must be entered into the address bar only. Usage of the search bar won’t lead you to the Wavlink login page but invite various other issues to your table.

4. Use the Correct Wavlink Login Password

On the Wavlink login page, the user is required to type the default WiFi repeater login password. However, several stances have noticed that users enter the wrong wifi wavlink com login password and hit the Login button without even verifying it. Perhaps, you have committed the same mistake. Know that the default Wavlink login password is case-sensitive. Thus, you can’t capitalize letters unnecessarily. In addition, ensure that you haven’t customized the WiFi repeater login password during the extender’s installation. In case you have, consider using the new Wavlink login password.

5. Reboot the Extender

As mentioned earlier that technical glitches are also responsible for creating Wavlink extender login issues, you need to get rid of them. To fix technical glitches, it is time to start fresh. So, reboot your Wavlink extender. For this, give a shot to the instructions mentioned below to troubleshoot Wavlink admin login issues:

  • Set the Power button to the off position to switch off your Wavlink extender.
  • Thereafter, unplug it from its respective wall outlet.
  • Give some time to your Wavlink extender to rest.
  • Now, re-plug the range extender into the wall socket.
  • Push the Power button to on.

Now, try accessing the wifi.wavlink.com login page and see if rebooting the extender brings you any luck.

6. Check the Power Supply

Did you ensure that your Wavlink extender is getting sufficient power to get success with the Wavlink WiFi login process? Probably not. To execute any extender-related operation, it is necessary that proper power is being supplied to your Wavlink device. Thus, you need to check whether your Wavlink device is operating on appropriate power or not. For this, have a look at the wall socket that is supplying electricity to the extender. If the wall socket is damaged, then consider using another socket to power up the device. Use a UPS in case your area is disadvantaged by abrupt power failures. Thereafter, check whether the Wavlink setup login success becomes yours this time.

7. Verify the Extender’s Location

The location of your extender is another factor that determines whether you get the wifi wavlink com login success or not. Wondering how? Well, if the extender is placed in an area filled with WiFi interference, you won’t even be able to access the Wavlink login page. Keep in mind that your extender must not be located in a WiFi interference zone. It means consider placing your Wavlink range extender away from reflexive surfaces, metal objects, thick concrete walls, electromagnetic waves emitting devices, and utensils containing a large amount of water. Placing the extender in the central room while doing Wavlink admin login can help a lot.

8. Bring Your WiFi Devices Closer

The lesser the distance separating your WiFi devices, the more the probability of getting success with the Wavlink login process. Thus, ensure that the distance is not greater than the value of the distance up to which your router transmits WiFi signals. But, never place your wireless devices adjoining each other. Otherwise, you might find yourself in another web of extender-related issues in addition to Wavlink WiFi login issues.

9. Check the Ethernet Connection

At times, users forget to check the condition of the Ethernet cable connecting their WiFi devices and proceed to do wifi wavlink com login. Did you follow the same path? Well, check the condition of the Ethernet cable right now. Also, see to it whether it is accurately connected to your WiFi devices. In case the Ethernet cable is found damaged, consider using a new one instead. If nothing is wrong with the Ethernet cable, then make the connection finger-tight to get wifi wavlink com login success.

10. Disable Antivirus Software Temporarily

There’s no doubt that antivirus software is good for your computers. The reason is that they prevent your PC from viruses and malware. But, it is also known to create Wavlink WiFi login issues. So, consider disabling it temporarily and see if you get success in logging in to your extender by accessing the Wavlink login page.

After following the above stated tips, you can do Wavlink WiFi extender login with ease. On the off chance, you are still struggling to do http //wifi.wavlink.com login, do not hesitate to take help from our well-versed professionals. For your information, they are available 24/7 to help users struggling with Wavlink admin login issues.

How to Change Wavlink Setup Login Password?

Every Wavlink extender comes with the default WiFi repeater login password so that users can easily make it up and running. But, users are suggested to change the default Wavlink setup login password. It is because hackers use to target devices with weak security standards. And, keeping the default Wavlink login password opens the doors for hackers as it is easy to guess. Follow the instructions given below to change the WiFi repeater login password by accessing the Wavlink login page:

Change Wavlink WiFi Extender Login Password
  • Plug your Wavlink extender into a well-working wall outlet and power it up.
  • Set the Mode Selector button to Repeater/ AP/ Router.
  • Create a connection between your devices.
  • Visit wifi.wavlink.com or ap.setup.
  • Now, enter the default WiFi repeater login password and select the language.
  • Clicking Login will take you to the Wavlink extender dashboard.
  • Select Setup and locate the Login Password option.
  • Enter the old http //wifi.wavlink.com login password.
  • Thereafter, enter the new WiFi repeater login password that you want your device to have.
  • Lastly, click Apply.

The new WiFi repeater login password will come into effect. Now, log out of your device and try to log in to it using the new Wavlink setup login password. Did you get success in reaching the Wavlink extender dashboard? No? Well, the time to get in touch with our experts has come. They will tell you where you lagged and help you change the Wavlink setup login password in a hassle-free manner.

Still Facing Issues? Contact Our Experts Right Away!

+1-888-965-7673

Can’t Access ap.setup Wavlink Login Screen?

Some Wavlink extender supports the ap.setup web address. It means the user needs to access the ap.setup Wavlink login screen in order to log in to the extender. But, some users find it difficult to succeed with the process. If you are also one of them, then learn these tips to successfully access the ap.setup Wavlink login screen:

  • First of all, ensure that your Wavlink extender and the host router share a strong connection.
  • Place your wireless devices a little closer.
  • The web browser used for accessing the ap.setup Wavlink login window must not be running on an obsolete software version.
  • Clear the browser’s unnecessary files to prevent the loading of cached ap.setup Wavlink login screen.
  • Restart your Wavlink extender.
  • Use the correct web address to reach the ap.setup Wavlink login screen.
  • See to it that your Wavlink extender is placed correctly.
Firmware Update via Wavlink WiFi Extender Login Page

After walking through these tips, you will be able to access the ap.setup Wavlink login screen. Once you reach there, consider filling in the ap.setup login password and clicking the Login button. If you reach the setup wizard, it means you’ve successfully completed the Wavlink WiFi extender login process via the ap.setup Wavlink login screen.

Wavlink WiFi Extender Login – FAQs

  • Ques 1. http //wifi.wavlink.com login password not working. What to do?

    Ans: Many users approach our technical experts complaining about the http //wifi.wavlink.com login password not working problem. Know that the problem arises when there are typos in the Wavlink login password entered by the user. Also, consider using the new password if the Wavlink setup login has been modified in the past.

  • Ans: Open an updated web browser on your computer after connecting the Wavlink extender to the host router. Type wifi.wavlink.com into the address bar and press Enter. The wifi wavlink com login page will welcome you. Here, enter the Wavlink setup login and click Login. Thereafter, a few instructions will appear on the screen. Follow them carefully to set up the extender. In case you are unable to install the extender via wifi wavlink com login page, you can contact our experts for immediate help.

  • Ans: Some users fail to do Wavlink admin login because the wifi.wavlink.com login window keeps asking for password. It happens when either the extender has fallen victim to technical glitches or the web browser used for the Wavlink extender login process is outdated and cached. So, reboot your extender. Also, update the web browser and make it cache-free. Thereafter, check whether the wifi.wavlink.com login window still keeps asking for the password.

  • Ans: Perhaps, there is a poor connection between your WiFi devices. So, consider connecting them properly. Also, consider hard-refreshing the internet browser you are using. Thereafter, try to do setup again and see if the process is still stuck at the Wavlink setup login page.

  • Ans: You need to tweak the settings of your Wavlink extender by accessing the http //wifi.wavlink.com login page in order to secure it. Here is what you have to do:

    • Update the firmware of the extender
    • Change the default Wavlink admin login password
    • Assign a new WiFi password to the Wavlink extender
    • Change the security standard of the extender

    On the off chance, you fail to get success with any of these processes by accessing the Wavlink WiFi extender login screen, contact our experts.

Disclaimer: We provide online support and information to users struggling with issues related to Wavlink WiFi devices. Any depiction of images, logos, trademarks, and product images are just for informational purposes as we are not involved with any organization or brand. We are third-party online support service provider who provides services on-demand to users.